


DIY monster sub for HT use
Hi-Fi 4 Sale - Malaysia / Singapore Audio Forum & Marketplace | www.hifi4sale.net :: Discussion Forum & Knowledge Base :: DIY Projects
Page 1 of 2 • 1, 2 ![]()
![]()
 DIY monster sub for HT use
![]() by jat Sat May 12, 2012 8:15 pm
by jat Sat May 12, 2012 8:15 pm
was contemplating on upgrading the weakest link in my home theater setup. placed an order for the venerable Rythmik FV15HP and got tired of waiting for it to arrive. so while enduring the lead time researched quite a bit on DIY-ing a monster sub, to see if it is even possible to get all the parts in malaysia, particularly locally in alor setar.
previously i concluded that it's impossible to get the sonotube locally as local contractors used fiberglass mold to build their round pillar.

using sonotube for sub construction will cut the build complexity tremendously as you only need a top and bottom cover and you got yourself a sub enclosure. the tube itself could be cut using a hand saw as it's made from paper. how simple is that..
with the sonotube out of the question there's only the usual box enclosure. so researched about that i think i could do it.
anyway i found most of the parts locally and after calculating i could match the cost for a good sub and (theoretically) get better performance from it. and not to mention having access to the driver's thielle-small parameters, allowing the possibility to build different enclosures to test how they'll interact in the room.
buying commercial would be too easy and it'll deprive me of a project to fill my time with. with the rythmik delayed again for the 3rd time i got tired of waiting and decided to cancel.

jat- Frequent Contributor

- Number of posts : 135
Age : 44
Location : malaysia
Registration date : 2009-03-15
Character sheet
Source(s):
Amplification:
Speakers:
![]()
![]()
Re: DIY monster sub for HT use
![]() by jat Sat May 12, 2012 8:38 pm
by jat Sat May 12, 2012 8:38 pm

simulated some of widely acclaimed driver to get a glimpse of their performance in sealed and ported alignment, while not requiring too much enclosure space.
some of the best candidate are Ficar audio Q15 or Q18, Ficar SSD15 or SSD18, Dayton Reference RSS High Output HO series, Mach 5 audio IXL and UXL series, TC Sounds Epic or LMS-R series, and Elemental Design 13AV.2 and their Ov series.

cone excursion are simulated to the output power from a Behringer EP4000 pro amp. 950W stereo into 4 ohm (measured to 650W continuous sine into 4 ohm).
jat- Frequent Contributor
- Number of posts : 135
Age : 44
Location : malaysia
Registration date : 2009-03-15
Character sheet
Source(s):
Amplification:
Speakers:
![]()
![]()
Re: DIY monster sub for HT use
![]() by jat Sat May 12, 2012 8:52 pm
by jat Sat May 12, 2012 8:52 pm
max i could accommodate in the front is 7 cubic feet sealed (about 5.5 - 6 cuft ported as the port itself takes precious enclosure space). at the back i could get away with about 6 cuft ported (about 7.5 - 8 cuft enclosure size) as there's more free space at the back.

port air speed is important here as i read countless times that you would want to keep the maximum air speed to below 35 m/s.
all the simulation are done using WinISD according to the driver T/S parameters and some are using data from actual measurement from other people. for rough enclosure size calculation i used hometheathershack's enclosure volume calculator.
jat- Frequent Contributor
- Number of posts : 135
Age : 44
Location : malaysia
Registration date : 2009-03-15
Character sheet
Source(s):
Amplification:
Speakers:
![]()
![]()
Re: DIY monster sub for HT use
![]() by jat Fri May 18, 2012 12:14 pm
by jat Fri May 18, 2012 12:14 pm
the ficar audio q series requires too much space for vented alignment. more than what i'm able to live with.
elemental designs 19Ov and 16Ov series are found to be off in actual measurement. using the measured parameters, the enclosure required for good performance are too large. they're more suitable for sealed alignment.
tc sounds epic and lms-r are too pricey to ship from the states.
elemental designs 13Av.2 series require too much cone movement to get good spl from them. some say they're not great with too much xmax.
dayton reference again are too pricey to bring into malaysia.
for the best simulated performance from a sealed and vented enclosure, decision have been made to go with the mach 5 ixl15.2.2 from innovative sound technologies. it's a 15" dual voice coil driver with 22mm excursion with rated wattage of 800W rms. each driver costs USD$329 each and i went with dual.
the driver performs optimally with 2 cubic feet sealed and 6 cubic feet vented. just nice with my space requirement.
jat- Frequent Contributor
- Number of posts : 135
Age : 44
Location : malaysia
Registration date : 2009-03-15
Character sheet
Source(s):
Amplification:
Speakers:
![]()
![]()
Re: DIY monster sub for HT use
![]() by jat Fri May 18, 2012 12:31 pm
by jat Fri May 18, 2012 12:31 pm

utilizing 18mm mdf, the cabinet size is 42cm x 45 cm x 50cm, triple baffled with cross bracing.
cabinet size are measured to be at 2.14 cuft after the bracing and driver volume.

with 950w it simulates for 104dB at 20Hz without any room gain.

cone excursion are kept under the xmax at all times with 950w of power. the natural rolloff of the amp are also simulated (-3dB at 4Hz) together with a 4th order cutoff at 100Hz.

amplifier maximum loading is only at around 650W peaking at 11Hz, which is rare for most movie material to have that much low frequency material. usual power requirement should only be around 400w max for most material (>25Hz). hopefully.
jat- Frequent Contributor
- Number of posts : 135
Age : 44
Location : malaysia
Registration date : 2009-03-15
Character sheet
Source(s):
Amplification:
Speakers:
![]()
![]()
Re: DIY monster sub for HT use
![]() by jat Fri May 18, 2012 1:21 pm
by jat Fri May 18, 2012 1:21 pm
the enclosure are designed to be assembled in the following order:
- bracing
- front baffle
- sides
- bottom
- back
- top
- outside baffle
the bracing are cut and glued and now glued to the front baffle

the sides are then aligned and glued to the front baffle.

then the bottom are aligned to the front baffle and sides and glued.
while assembling the cabinet i found out that it's best to leave around 4 mm to the sides which could be extended and then routed flush with a router. even though i measured all the cuts to within 0.5mm to the drawing i still sometimes get 1-2mm of gap during assembly.
jat- Frequent Contributor
- Number of posts : 135
Age : 44
Location : malaysia
Registration date : 2009-03-15
Character sheet
Source(s):
Amplification:
Speakers:
![]()
![]()
Re: DIY monster sub for HT use
![]() by jat Sat May 19, 2012 9:04 am
by jat Sat May 19, 2012 9:04 am

found them in Ace Hardware IKANO power center. a bottle for RM35 i think. with 2 sealed subs nearly completed, i'm only at a quarter bottle. i reckon a bottle is enough 5-6 subs.
the gluing power is unmatched. if you stick 2 panels forming an 'L' shape and leave it for a day, once dried if you try to pry it the panels will give in before the glue. no wonder it's popular for sub build.
jat- Frequent Contributor
- Number of posts : 135
Age : 44
Location : malaysia
Registration date : 2009-03-15
Character sheet
Source(s):
Amplification:
Speakers:
![]()
![]()
Re: DIY monster sub for HT use
![]() by kp93300 Sat May 19, 2012 9:17 am
by kp93300 Sat May 19, 2012 9:17 am
Thanks for sharing your project. Admire you for skills in both woodwork and electronics----true blue diyers!
regards
kp93300
kp93300- Regular

- Number of posts : 98
Age : 67
Location : kuching
Registration date : 2009-07-20
![]()
![]()
Re: DIY monster sub for HT use
![]() by jat Sun May 20, 2012 8:51 am
by jat Sun May 20, 2012 8:51 am
thanks for the compliment. actually sub building is easier than amp building. to skip the electronics completely with a subwoofer build, we can buy a pro amp and get away with it. no headache with ground loop, protection circuit, things going up in smoke, etc.kp93300 wrote:Jat
Thanks for sharing your project. Admire you for skills in both woodwork and electronics----true blue diyers!
regards
kp93300
a good choice (in which i was previously considering) would be the Behringer EP4000. readily available in jalan pasar for RM1.8k a piece. for a stereo amp that could give 950w each channel it's a good choice to consider.


stable until 1 ohm. bridgeable mono from 2 ohm until 8 ohm. 2000W rms into bridged 4 ohm is not bad at all. and it's flat until 5hz.
jat- Frequent Contributor
- Number of posts : 135
Age : 44
Location : malaysia
Registration date : 2009-03-15
Character sheet
Source(s):
Amplification:
Speakers:
![]()
![]()
Re: DIY monster sub for HT use
![]() by jat Wed Jul 04, 2012 8:58 pm
by jat Wed Jul 04, 2012 8:58 pm

my god these things are huge

my wife still have no idea that i'm gonna have 6 of these 15 inchers spread across the living room muahaha

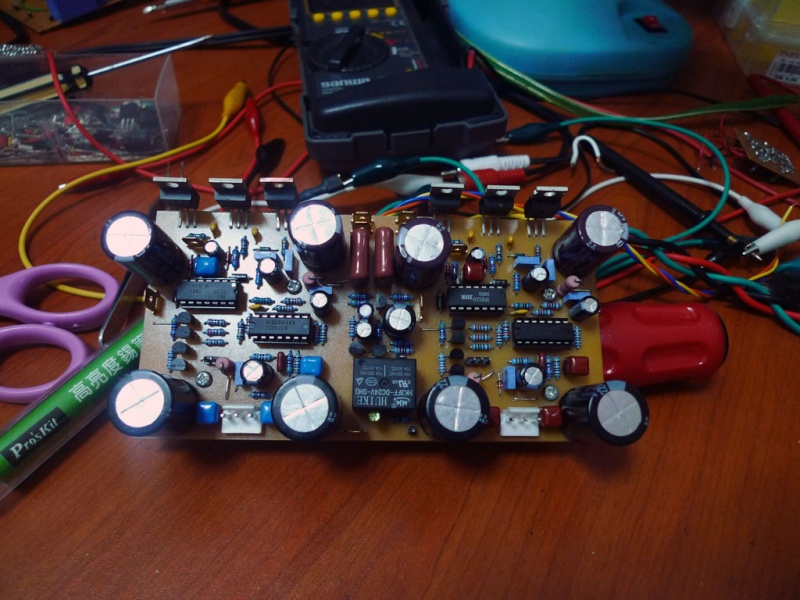
also managed to build my first class D amp (which hopefully will be powering all the multitude of subs)
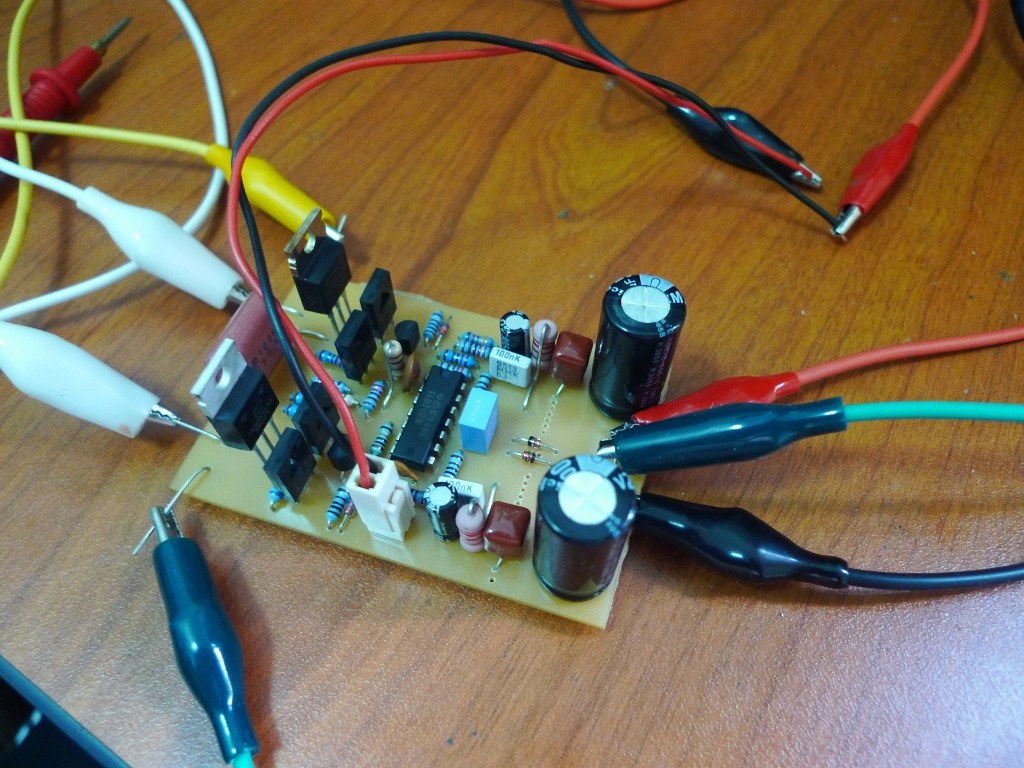
having no heat output from any of the component during playback is indeed a new experience. didn't even bother to slap any heatsink as there's no heat output at all. freaking high efficiency.
less than 20 components in total, no heatsink, useable voltage from 18v up till high 50v, no heat, high efficiency, and initial testing shows that it's really acceptable as 'high fidelity'.
and did i say 200w continuous into 4 ohm? freaking class d... sigh. why u gotta be so high efficiency?
jat- Frequent Contributor
- Number of posts : 135
Age : 44
Location : malaysia
Registration date : 2009-03-15
Character sheet
Source(s):
Amplification:
Speakers:
![]()
![]()
Re: DIY monster sub for HT use
![]() by jat Thu Jul 05, 2012 8:00 pm
by jat Thu Jul 05, 2012 8:00 pm
it's really musical sounding. demmit. i really don't wanna pry open the resident amp and change the modules again.
jat- Frequent Contributor
- Number of posts : 135
Age : 44
Location : malaysia
Registration date : 2009-03-15
Character sheet
Source(s):
Amplification:
Speakers:
![]()
![]()
Re: DIY monster sub for HT use
![]() by jat Fri Jul 06, 2012 10:18 am
by jat Fri Jul 06, 2012 10:18 am

it seems that the mdf itself have variation between each board. i've measured some to be 18mm, at another section 18.5mm and in some other board it's at 19mm. so it's better to cut the panels an extra 4-5mm and use a router to flush mount it after gluing.
this is the result after flush mounting on another panel:

but you need a router to properly do it. and a flush mount router bit. both of which ain't exactly cheap.
and it's a good idea to caulk the internal using silicone to seal any air gaps if there's any. since a silicone tube is only selling for RM5 a piece and you only need half tube for each box it's a good thing to do so.

i'm using your normal grade clear silicone sealant. most hardware store should have these. if you could find natural curing silicone sealant get that as acetoxy/acetic curing sealant will release acetic acid during curing thus will eat up your electronics/driver.
if you can't find any natural curing silicone and have to use acetic silicone do leave a few days for the silicone to cure properly. i can't find any natural curing silicone over here so i just use the acetoxy.

this is after caulking the internals. use your fingers to line the silicone after squeezing them to the corners to get a perfect seal.
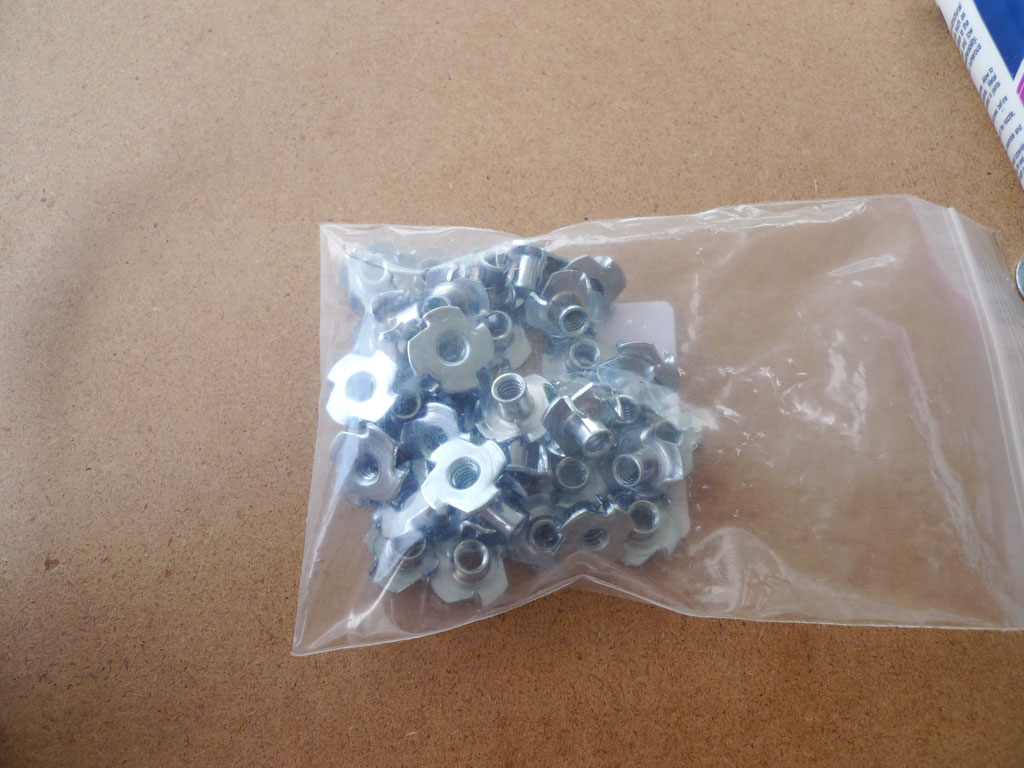
driver mounting are done using t nuts. get the t-nuts from your local hardware store which have their width in milimeters.
it's kindda hard to find, but beats having to source for inch depth keys to mount them with. i ordered from parts-express and got the inch version.
make sure to get the mm version rather than inch version.
and be sure to hot-glue the sides to make sure they don't come off during mounting.

you could use terminal jacks or binding post for connection, but i do think neutrik speakon connectors are better since it doesn't protrude as much. easier to move around. and binding posts are hard to come by in appropriate long length.

jat- Frequent Contributor
- Number of posts : 135
Age : 44
Location : malaysia
Registration date : 2009-03-15
Character sheet
Source(s):
Amplification:
Speakers:
![]()
![]()
Re: DIY monster sub for HT use
![]() by jat Tue Jul 10, 2012 10:00 am
by jat Tue Jul 10, 2012 10:00 am
even when limited to 150w (limited by my bench power supply) i could get the sub to play down to 10Hz without clipping. no idea on the spl level, but it sure made one feel dizzy without hearing any sound coming from it, just cone movement. 20Hz tone plays fine and left the door vibrating.

low F(s)-free space resonance driver don't need huge power to move the cone at the resonant frequency. the woofer that i'm using have a resonant frequency of 19Hz. even with only 1w of power, you could get the driver to reach 75dB at 20Hz (inside a 2.14 cubic feet enclosure).
i could only imagine what i'll be experiencing once i bridge the amp and feed it with 750w.
jat- Frequent Contributor
- Number of posts : 135
Age : 44
Location : malaysia
Registration date : 2009-03-15
Character sheet
Source(s):
Amplification:
Speakers:
![]()
![]()

vt4c- Frequent Contributor
- Number of posts : 149
Age : 54
Location : M'sia
Registration date : 2009-05-09
![]()
![]()
Re: DIY monster sub for HT use
![]() by Wikin Sat Jul 14, 2012 12:14 pm
by Wikin Sat Jul 14, 2012 12:14 pm
Excellent work there. Just to clarify, are you building an el-pipo sub ala Nelson Pass:
http://www.passdiy.com/pdf/el-pipe-o.pdf
or is this a ported sub?
Anyways do take care of your lungs as those MDF dust are carcinogenic.
cheers.

Wikin- Frequent Contributor
- Number of posts : 439
Age : 47
Location : Melbourne
Registration date : 2009-03-05
Character sheet
Source(s): PC Audio
Amplification: Tri Amping Active
Speakers: High Eff Open Baffle
![]()
![]()
Re: DIY monster sub for HT use
![]() by jat Mon Jul 16, 2012 9:57 am
by jat Mon Jul 16, 2012 9:57 am
from a rough scrolling though the pdf, i believe the el-pipo is a bass reflect design similar to the tapped horn design that i have planned.Wikin wrote:Hi Jat,
Excellent work there. Just to clarify, are you building an el-pipo sub ala Nelson Pass:
http://www.passdiy.com/pdf/el-pipe-o.pdf
or is this a ported sub?
Anyways do take care of your lungs as those MDF dust are carcinogenic.
cheers.
el-pipo uses a tall sonotube which we can't get here in malaysia, so i'm thinking of the tapped horn design that are now heavily experimented at avsforum. lots of people are giving very good feedback from such design.
but the boxes are gonna be huge. as huge as your closet. which i'm sure will land me an earful if i were to indulge in such experiment in my living room. nonetheless, i'm trying to convince my friend to try building one (or two) out for his upcoming HT room.
el-pipo uses a tall sonotube which we can't get locally. but this, on the other hand, have all the parts (or equivalent parts) which we can get locally:


properly documented here: http://www.avsforum.com/t/1414166/alpine-swr-12d2-tapped-horn-audio-memorial-bbq-get-together
a big sub, but not crazily too big for most HT room. and a pair of it will definitely kill any ported sub commercially available to mankind.
best thing is, you could build one with local parts.
jat- Frequent Contributor
- Number of posts : 135
Age : 44
Location : malaysia
Registration date : 2009-03-15
Character sheet
Source(s):
Amplification:
Speakers:
![]()
![]()
Re: DIY monster sub for HT use
![]() by Wikin Mon Jul 16, 2012 10:22 am
by Wikin Mon Jul 16, 2012 10:22 am
jat wrote:from a rough scrolling though the pdf, i believe the el-pipo is a bass reflect design similar to the tapped horn design that i have planned.
el-pipo uses a tall sonotube which we can't get here in malaysia, so i'm thinking of the tapped horn design that are now heavily experimented at avsforum. lots of people are giving very good feedback from such design.
The el-pipo is more of a transmission line. Hey why not build a transmission line subwoofer that span the height from your floor to the ceiling - that way the cabinet can be slimmer and pretty flushed onto your wall. Assuming your hall has a typical height of 11-12 feet, you can put the driver on the floor height, and make a 2 fold transmission line. The general rule is to start the line behind the driver with 1.25 x 'surface area of the woofer' and then taper it to 0.75 x 'surface area of woofer'. You can easily end up with a 20ft line with superb sub bass performance.
I beg to differ on building a horn sub - have seen many of those horn pro-sub in Jalan Pasar and they are pretty damn good in performance for the price. My argument is that why build something that's commonly available?
cheers.
Wikin- Frequent Contributor
- Number of posts : 439
Age : 47
Location : Melbourne
Registration date : 2009-03-05
Character sheet
Source(s): PC Audio
Amplification: Tri Amping Active
Speakers: High Eff Open Baffle
![]()
![]()
Re: DIY monster sub for HT use
![]() by jat Thu Jul 19, 2012 3:39 pm
by jat Thu Jul 19, 2012 3:39 pm

thanks for the idea. it could be very possible to build a single folded horn and make it flush with the front projector screen.
i reckon the horn sub in jalan pasar are PA subs tuned for high 30s frequency. no idea how low it'll go. most of the PA speakers that i've heard are tuned for SPL and not SQ
all the horn subs that i've seen people build when tuned really low have a massive enclosure. didn't really focus much on it tho. anyway i've burned 4 of the class d modules that i've built during test. still trying to grasp a better understanding on the architecture.
jat- Frequent Contributor
- Number of posts : 135
Age : 44
Location : malaysia
Registration date : 2009-03-15
Character sheet
Source(s):
Amplification:
Speakers:
![]()
![]()
Re: DIY monster sub for HT use
![]() by jat Thu Jul 19, 2012 7:08 pm
by jat Thu Jul 19, 2012 7:08 pm


you can see the difference in built quality compared to the previous quad.

the first twins. not really finished. there's a final third front baffle. initial test mount to check for air leaks.

and the bridged module that will be powering them. about ~612W into each sub. hopefully nothing blow up haha
jat- Frequent Contributor
- Number of posts : 135
Age : 44
Location : malaysia
Registration date : 2009-03-15
Character sheet
Source(s):
Amplification:
Speakers:
![]()
![]()
Re: DIY monster sub for HT use
![]() by jat Thu Jul 19, 2012 10:25 pm
by jat Thu Jul 19, 2012 10:25 pm

so hooked everything up. messy test setup. a controlled mess.
dragged my 2 year old out of the room. reopened the user guide to refresh my memory and plugged the minidsp to the laptop.
low pass here, high pass there, bit of gain, tweak tweak here and there and viola!
16mV of dc offset, fully bridged class d giving out an ample 600w. i don't think i'm using more than 20w to bring the sub to listening level judging from the cone movement. don't think there's more than 2mm of movement to get to listening volume. and this baby got 22mm of linear excursion, ~70mm peak to peak before mechanical limit.
did i say i'm only powering up just one driver? she knocked the door just now saying it sounds like a disco. imagine her face when she comes back from work and sees 6 of them beauties. priceless haha
jat- Frequent Contributor
- Number of posts : 135
Age : 44
Location : malaysia
Registration date : 2009-03-15
Character sheet
Source(s):
Amplification:
Speakers:
![]()
![]()
Re: DIY monster sub for HT use
![]() by Wikin Fri Jul 20, 2012 3:02 pm
by Wikin Fri Jul 20, 2012 3:02 pm
jat wrote:you mean something like this?
Something like this:

jat wrote:
i reckon the horn sub in jalan pasar are PA subs tuned for high 30s frequency. no idea how low it'll go. most of the PA speakers that i've heard are tuned for SPL and not SQ
Well this also applies to most of the HT subs isn't it? Go have a listen to the mini cineplexes in the hi-fi show and tell me if you hear quality bass in the explosions or merely one note boom boom bass
Wikin- Frequent Contributor
- Number of posts : 439
Age : 47
Location : Melbourne
Registration date : 2009-03-05
Character sheet
Source(s): PC Audio
Amplification: Tri Amping Active
Speakers: High Eff Open Baffle
![]()
![]()
Re: DIY monster sub for HT use
![]() by jat Sat Jul 21, 2012 1:43 pm
by jat Sat Jul 21, 2012 1:43 pm
most, but not all of the HT subs available on the market are that bad. some properly done HT setup, especially in the bass department will beat most cineplex with ease. in fact i've never heard a cineplex sound quality to be as good as the best HT setup that i've came across.Wikin wrote:
Well this also applies to most of the HT subs isn't it? Go have a listen to the mini cineplexes in the hi-fi show and tell me if you hear quality bass in the explosions or merely one note boom boom bassThe main advantage these PA subs have over HT subs is that the PA can reproduce realistic SPL of the explosions while the HT subs already start to fart and knock on its own basket.
YMMV, but i know at least for me that i don't have the slightest interest in going out to catch another movie at the cinema, at any cinema for that matter to avoid disappointment in the end. not saying that my system is any good, but at least i don't feel the need to experience a bad sound setup that spoils the experience. i rather wait for the bluray to be released.
that being said, data-bass.com have a proper, extensive and scientific measurement of some of the best bass transducers and system. not only SPL are measured, but also their extension, distortion etc without any bias for any system.
they did a test on one of the popular offering used in cinemas:
http://www.data-bass.com/data?page=system&id=68
and the data shows by itself. high SPL, but doesn't reach to the low octaves where the explosion not only hit you in the chest, but also brushes on your face. some of the best bluray releases have the audio going down to 5Hz. which no PA sub would be able to recreate.
so i beg to differ. HT sub when properly engineered, designed and tuned will always sound better than any PA sub, especially when movie playback in home environment are concerned.
as for the transmission line design, i'm still more inclined towards the folded horn if i were to indulge in such experiment. at least folded horn have been exhaustively tested and measured and they do produce great result.
all the top 3 (click for link) at 16Hz-100Hz output are tapped horn, and all 8 of the top are DIY.
jat- Frequent Contributor
- Number of posts : 135
Age : 44
Location : malaysia
Registration date : 2009-03-15
Character sheet
Source(s):
Amplification:
Speakers:
![]()
![]()
Re: DIY monster sub for HT use
![]() by jat Tue Jul 24, 2012 1:38 am
by jat Tue Jul 24, 2012 1:38 am
now you don't really think a 15" driver mounted in a simple sealed box could be classified as a monster, no? naah.. that'd be too simple. where's the fun in that?

this my friend, is the actual monsters. the first pair.
jat- Frequent Contributor
- Number of posts : 135
Age : 44
Location : malaysia
Registration date : 2009-03-15
Character sheet
Source(s):
Amplification:
Speakers:
![]()
![]()
Re: DIY monster sub for HT use
![]() by jat Sat Jul 28, 2012 7:26 pm
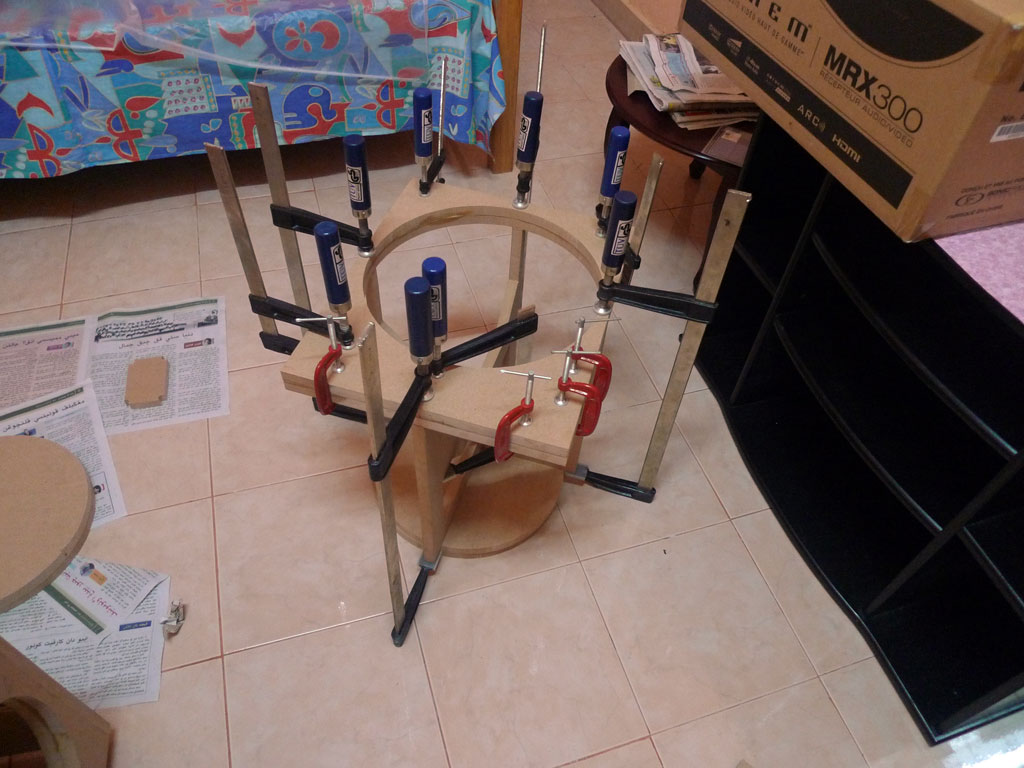
by jat Sat Jul 28, 2012 7:26 pm
6 hours of clamping and i move on to glue the next enclosure. 24 hours as recommended to let the glue dry thoroughly and the cycle continues.

2 more panels to go and i can start painting. gotta love the building process. it's like building lego pieces as the panels just fit together perfectly. lego for grown-ups.
on the other front, i burned the previous class d module (again) during stress test. the simpler class d ain't really stable with low impedance. giving up after 5 modules got burned.
another class d module utilizing another architecture with a proper gate driver. supposedly scaleable till 1250W into 4 ohm with proper power supply. we'll see..
if should this burns again i'm gonna go all out with paralleled output mosfets and overcurrent protection.
jat- Frequent Contributor
- Number of posts : 135
Age : 44
Location : malaysia
Registration date : 2009-03-15
Character sheet
Source(s):
Amplification:
Speakers:
![]()
![]()
Re: DIY monster sub for HT use
![]() by jat Sat Aug 04, 2012 12:08 pm
by jat Sat Aug 04, 2012 12:08 pm

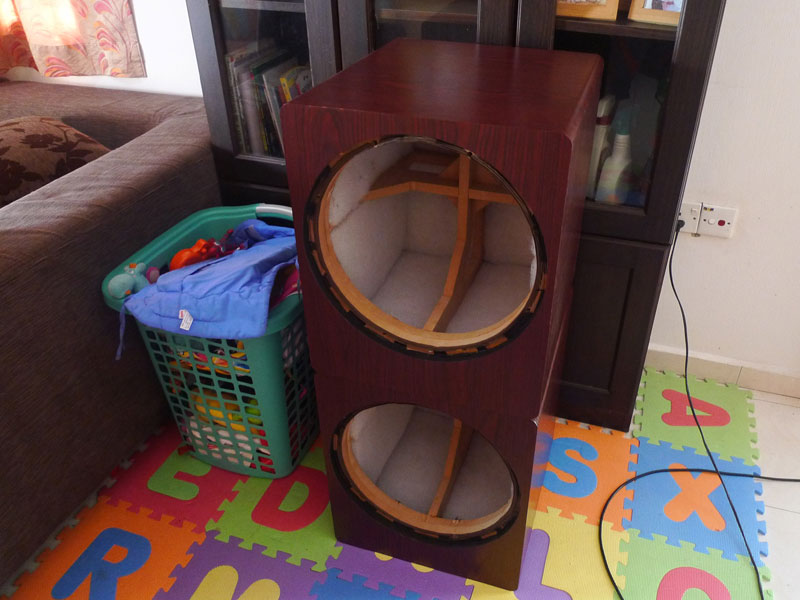
its a really close fit between the driver and the cabinet. originally the cabinet are intended for a dual 12" Alpine Type R but then i got greedy.
jat- Frequent Contributor
- Number of posts : 135
Age : 44
Location : malaysia
Registration date : 2009-03-15
Character sheet
Source(s):
Amplification:
Speakers:
![]()
![]()
Re: DIY monster sub for HT use
![]() by vt4c Sun Aug 05, 2012 10:59 am
by vt4c Sun Aug 05, 2012 10:59 am
vt4c- Frequent Contributor
- Number of posts : 149
Age : 54
Location : M'sia
Registration date : 2009-05-09
![]()
![]()
Re: DIY monster sub for HT use
![]() by jat Thu Aug 16, 2012 10:48 pm
by jat Thu Aug 16, 2012 10:48 pm
yes, that's indeed a lecroy scope. tho the setup isn't at work, but at the back room slash study room slash lab i have at home.vt4c wrote:Nice work, Jat! Is that a LeCroy scope you've at work?

manage to stabilize two of the class d modules and test mount them to a case. each module is a bridged-balanced amp capable of about ~600w rms into 4 ohm. 2 modules on each side to drive each sub for a total of ~1260w rms. still waiting for parts to arrive for a better design since i've blown some few expensive pwm chip.

also finished the third baffle for the single pair and test mounted the bass towers.
experimented with down-firing woofer with 1-1/4" legs. turns out there's just not enough clearance for such high displacement. people are suggesting at least 4" of clearance for 15" woofer.

the internals are lined with..... guess what..... aquarium filter

we opened a paradigm sub and found that it's not lined with the usual fibreglass but with a white fluffy material and a friend commented that it looks like the white aquarium filter haha.
well it's cheap, sticks well to the mdf panel with pva white glue and readily available your nearest aquarium petshop haha
jat- Frequent Contributor
- Number of posts : 135
Age : 44
Location : malaysia
Registration date : 2009-03-15
Character sheet
Source(s):
Amplification:
Speakers:
![]()
![]()
Re: DIY monster sub for HT use
![]() by jat Mon Sep 17, 2012 9:18 pm
by jat Mon Sep 17, 2012 9:18 pm
avoid using the normal wood filler/wood putty if you can. they're really brittle and while they're fine for wood cracks or filling holes in the center of the wood, they're really not suitable for edge repair.
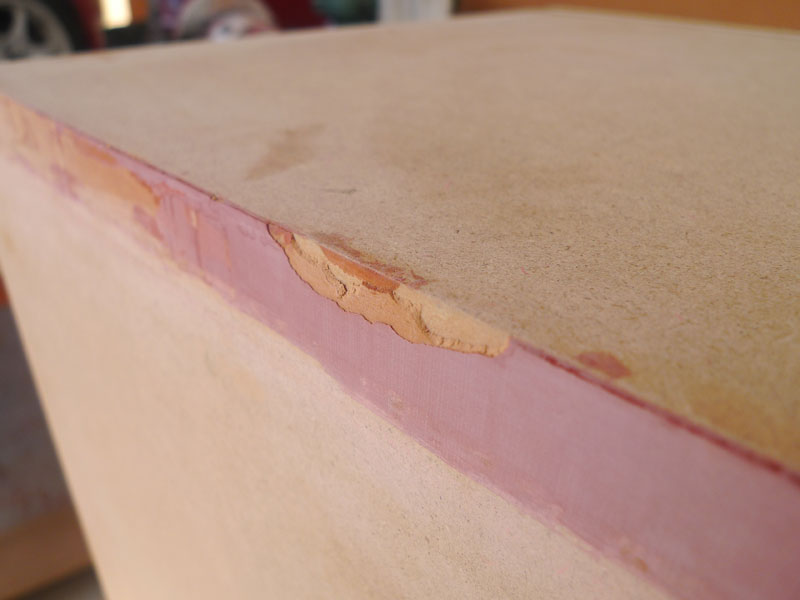
this is what i got from using wood filler. the light cream is the wood filler that won't stick properly to the wood edge. one knock and they'll come right off. hair pulling experience when they keep cracking here and there requiring you to redo the spots that you've already repaired.

read on the net where people suggesting to use 3M bondo for their sub repair before applying the finish. but like most other stuffs, i can't find them in malaysia.
so read a bit more and got a few other suggestion and none of which product could be found locally. read that some people are using automotive filler. a quick trip to an automotive paint supplier and i found quite a bunch of different automotive filler in which the shopkeeper have no advice as to what would be good for wood/MDF repair. not even a trip to different supplier helped.
they don't do automotive fillers for wood application.
read a bit more, researched a bit more and got a scientific answer: POLYESTER BASED.
another trip to a supplier and brought home a few different filler to test. one with fibreglass backing in the mixture, one poly filler don't need a hardener, one poly filler requiring a hardener compound.

so that other people don't need to go through the same procedure, get this.
fibreglass backed filler are hard to apply because of all the fibre sticking out.
poly filler without a hardener took longer time to cure.
i got this 1kg putty for RM15 over here. pretty cheap for the performance that it gives. i won't use another wood putty again. ever.

this poly filler cures to a plastic like material and sticks very well to the wood. they don't shrink during curing (like the water based wood filler do) and a single application is usually enough. no need to revisit the spot once you repair them.
the best and easiest way to repair the wood and get a flat edge is to apply the filler as a blob and route them flush after they hardened. a quick sanding after that and you'll get a nice and even base.

once the edges are nice and flat i choose to finish them off with a mahogany vinyl.
jat- Frequent Contributor
- Number of posts : 135
Age : 44
Location : malaysia
Registration date : 2009-03-15
Character sheet
Source(s):
Amplification:
Speakers:
![]()
![]()
Re: DIY monster sub for HT use
![]() by jat Thu Sep 20, 2012 10:51 am
by jat Thu Sep 20, 2012 10:51 am
was hoping to do a better job, but then again it is my first ever build with a less than perfectly flat joints.

there's a few overcuts like this. some because of the wood filler used. some because i was rushing into it. some because of luck. still learning the ropes.
i tried routing the extra vinyl flush but that doesn't turn out well. seems that using a sharp knife will produce a better result, but require a perfect flat base.
jat- Frequent Contributor
- Number of posts : 135
Age : 44
Location : malaysia
Registration date : 2009-03-15
Character sheet
Source(s):
Amplification:
Speakers:
![]()
![]()
Re: DIY monster sub for HT use
![]() by jat Thu Sep 20, 2012 12:35 pm
by jat Thu Sep 20, 2012 12:35 pm

next would have to be the grill.
jat- Frequent Contributor
- Number of posts : 135
Age : 44
Location : malaysia
Registration date : 2009-03-15
Character sheet
Source(s):
Amplification:
Speakers:
![]()
![]()
Re: DIY monster sub for HT use
![]() by zulkifar Fri Sep 21, 2012 4:11 pm
by zulkifar Fri Sep 21, 2012 4:11 pm
zulkifar- Club Member

- Number of posts : 44
Age : 64
Location : Kuala Lumpur
Registration date : 2009-10-27
Character sheet
Source(s): LP,CD
Amplification: SET
Speakers: Dynamic
![]()
![]()
Re: DIY monster sub for HT use
![]() by tbcheese Sun Sep 23, 2012 11:49 am
by tbcheese Sun Sep 23, 2012 11:49 am
tbcheese- New Member

- Number of posts : 1
Age : 40
Location : Petaling Jaya
Registration date : 2012-01-05
![]()
![]()
Re: DIY monster sub for HT use
![]() by jat Sun Sep 23, 2012 5:36 pm
by jat Sun Sep 23, 2012 5:36 pm
will do bro. that is if decide to venture into speaker building.zulkifar wrote:I think for a first timer, the speakers look fantastic. In future if ever you decide to do the finishing in real wood veneer, kindly share your experience as you did in this case. Your tip on the alternative wood filler is very useful for me. Thank you very much for sharing and I hope you enjoy the extra oomph from those monsters!
found a supplier here having nyatoh veneer in stock for RM60 IINM for 2 feet x 4 feet sheet. gonna be very hard for me to bend them as i was looking to curve the sides so i skip them. gonna be suitable to finish off a floorstander perhaps.

my friend had just finished building his first DIY floorstander but still undecided on what type of finishing to be used. will try to take some picture of the finishing process if i can.
they do don't they. unbelievable how much ~RM50 worth of vinyl could do to the outlook. a far cry compared to the original cabinets that i started with.tbcheese wrote:They look absolutely incredible. Congrats and thanks for sharing =)
it took me 9 feet of vinyl to fully cover both sub. the vinyls are sold for RM6 a feet (4 feet width) for a grand total of RM54.
and they don't require any kind of special sealer or surface preparation as paint would do. took only 2 hours to do.
jat- Frequent Contributor
- Number of posts : 135
Age : 44
Location : malaysia
Registration date : 2009-03-15
Character sheet
Source(s):
Amplification:
Speakers:
![]()
![]()
Re: DIY monster sub for HT use
![]() by jat Thu Oct 04, 2012 10:38 pm
by jat Thu Oct 04, 2012 10:38 pm
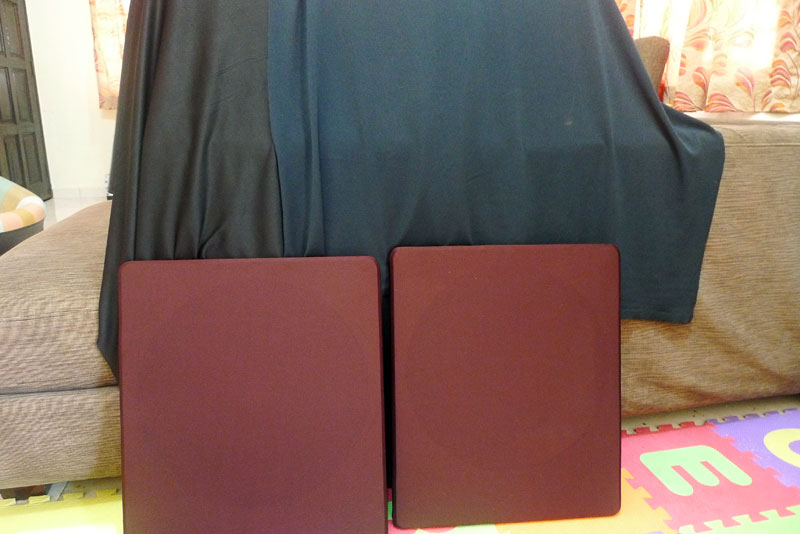
rather than using the black cloth i decided to go with the brown cloth as it matches the enclosure outlook better. might not be everyone cup of tea though.
the right side black cloth in the background is a specially made grill cloth sourced from jalan pasar. for RM15 (IINM) for 1 meter x 1 meter. and while that's not overly expensive i managed to find the left side stretchable cloth (which i think is suitable as a grill cloth) for RM3-something for 1.2m x 1m. might wanna take a look at your usual kedai kain (no idea what they're called in english) like jakel or those in jalan TAR before buying at jalan pasar. they should have a lot more colour to choose from.
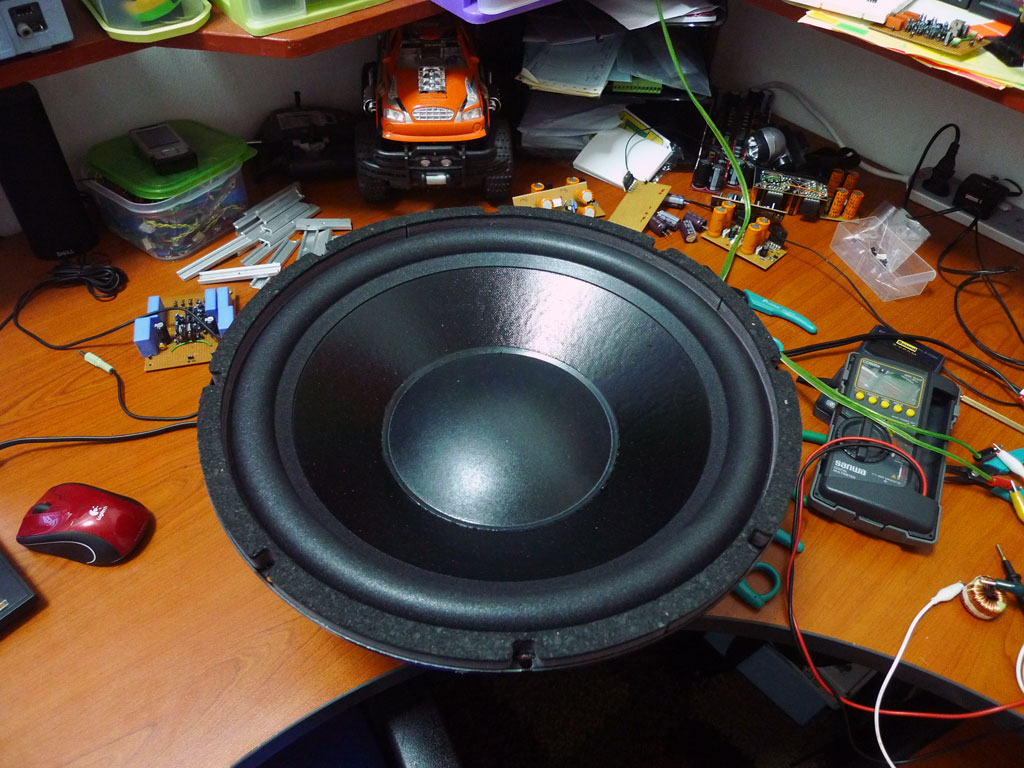
and just a sneak peek at things to come:

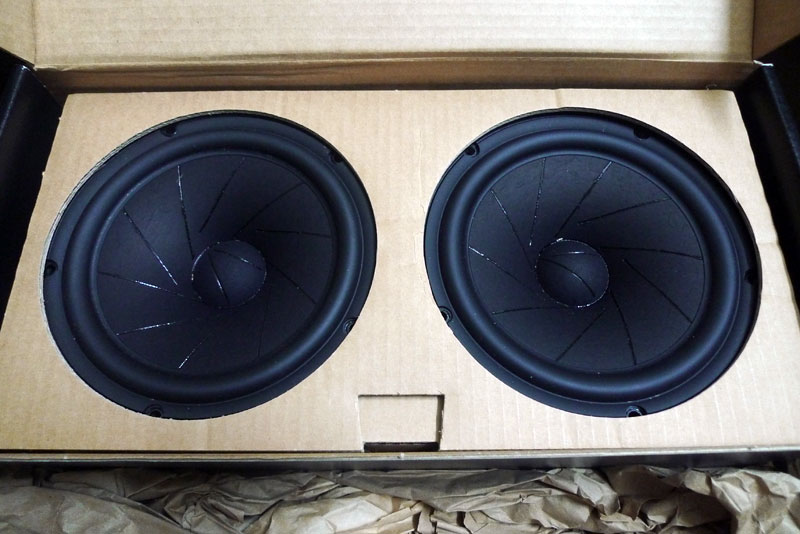
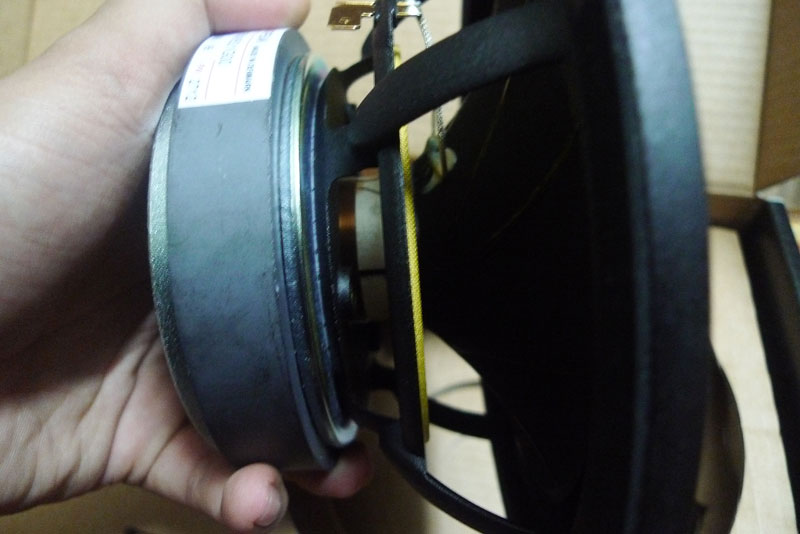
underhung magnet, die-cast aluminium spider, sliced paper cone.
i'll try my best to document the build process which will start tomorrow.
jat- Frequent Contributor
- Number of posts : 135
Age : 44
Location : malaysia
Registration date : 2009-03-15
Character sheet
Source(s):
Amplification:
Speakers:
![]()
![]()
munwai- New Member
- Number of posts : 5
Age : 41
Location : KL
Registration date : 2009-05-31
![]()
![]()
Re: DIY monster sub for HT use
![]() by bal Wed Oct 17, 2012 10:18 am
by bal Wed Oct 17, 2012 10:18 am
Bal:flower:
bal- Moderator

- Number of posts : 1275
Age : 60
Location : Bangsar, medan damansara area
Registration date : 2009-03-06
Character sheet
Source(s): CEC T2, Oppo blu ray, mac mini running Audirvana thro Teac ud 501 dac
Amplification: conrad Johnson, Oddessy Khartago mono b
Speakers: maggie 1.7
![]()
![]()
Re: DIY monster sub for HT use
![]() by jat Wed Oct 17, 2012 10:21 pm
by jat Wed Oct 17, 2012 10:21 pm
spot on.munwai wrote:Scanspeak Rediscovery?
it's not my project though. not venturing into speaker building just yet. as it's a friend's project i didn't get enough pictures on the build process to properly document how it all went.
they're really excellent. great for both music and home theater usage. the underhung motor had really long excursion before reaching mechanical limit. looks like it went nearly 1.5 cm one way before hitting anything.bal wrote:Revelators. Really super excellent drivers.
Bal:flower:
the speaker build process went too fast for me to take any decent pictures for any credible documentation. maybe next time.

anyway i'm slowly starting the bass reflex/ported/vented sub build. it's a smaller, 2.92 cubic feet with a slot port tuned to 14Hz and 20Hz (multiple tuning).

panels have been cut to length and i'll start on the build once i get the pesky class D amp to stabilize.

i managed to make this bridged channel work at ~1260W into 4 ohm without any heatsink. the other channel on another pcb refuse to oscillate properly. sheesh..
jat- Frequent Contributor
- Number of posts : 135
Age : 44
Location : malaysia
Registration date : 2009-03-15
Character sheet
Source(s):
Amplification:
Speakers:
![]()
![]()
Re: DIY monster sub for HT use
![]() by munwai Wed Oct 17, 2012 11:31 pm
by munwai Wed Oct 17, 2012 11:31 pm
ah okay, I have some of the components already and planning to get the rest and start work on it in very near future, thought I could see the build process to understand better. Do share your thoughts on how it sounds when it's up and runningjat wrote:
it's not my project though. not venturing into speaker building just yet. as it's a friend's project i didn't get enough pictures on the build process to properly document how it all went.
munwai- New Member
- Number of posts : 5
Age : 41
Location : KL
Registration date : 2009-05-31
![]()
![]()
Re: DIY monster sub for HT use
![]() by jat Mon Oct 22, 2012 1:39 pm
by jat Mon Oct 22, 2012 1:39 pm
you won't regret it. at RM3k a pair fully built there's no competition.munwai wrote:
ah okay, I have some of the components already and planning to get the rest and start work on it in very near future, thought I could see the build process to understand better. Do share your thoughts on how it sounds when it's up and running

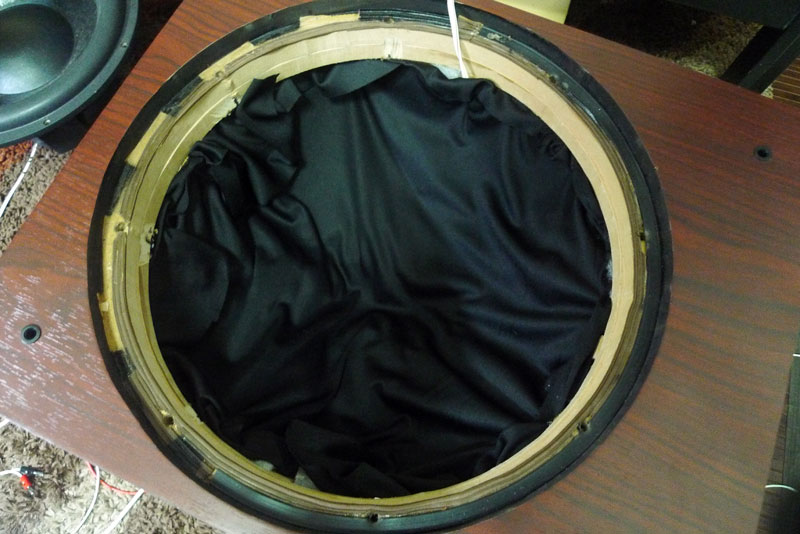
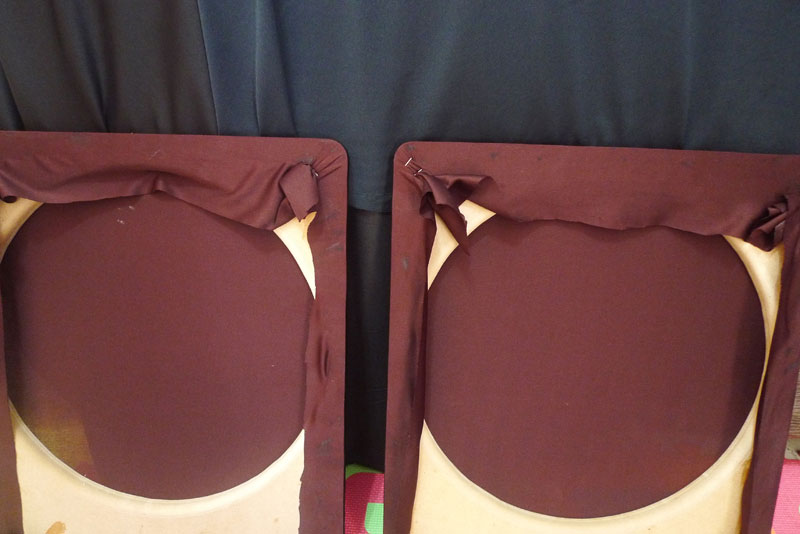
filled the subs with polyester filler taken from tesco's cheap foam pillow. stuffed the cabinet till it's nearly full (about 3/4 of the pillow) then stapled them shut with the grill cloth that i've bought previously.
most diy-er suggest a pound of stuffing for each cubic feet of space but that seemed a bit too much. one of the tesco pillow is about a pound.

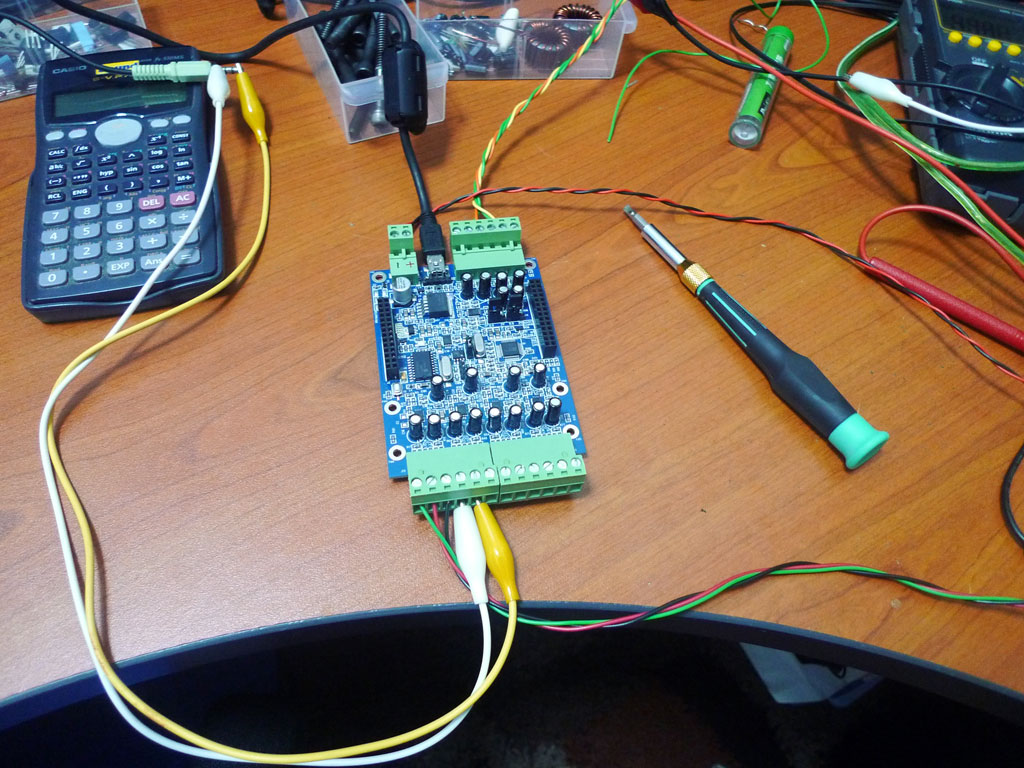
managed to get the class d amp working stable enough that i'm happy with their performance and reliability that i've cased them up. the top right pcb is a 2x4 balanced minidsp to provide dsp processing to the amp. i'm supposed to fill the large empty area with an arduino microcontroller to automate component starting sequence but i've yet to receive the microcontroller.
the amp is a quad channel amp bridged to 2 channel. switched at 250khz, powered with 50V-0-50V rails, 21uh output inductance for about 15khz cutoff at 2 ohm. they should provide clean output to about ~1.2kw to each channel. the output mosfet are mounted to a heatsink underneath the pcb. development of the amp are carried out at diyaudio.
the subs response measured at listening position:
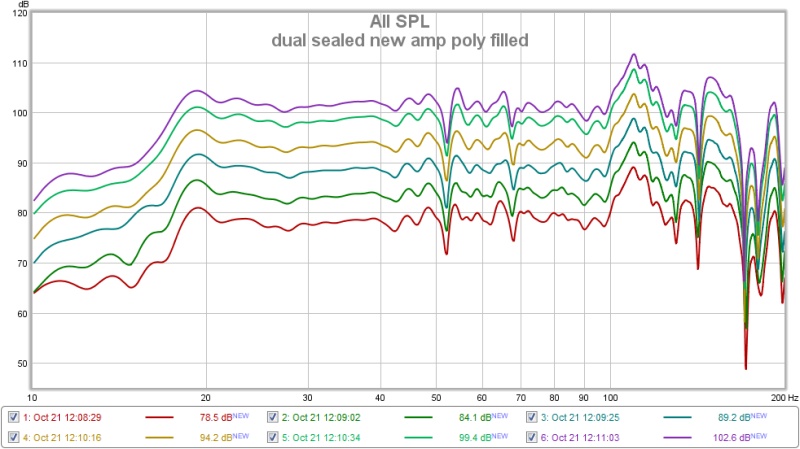
had to stop at ~102db cause i heard a loud snap from the front window. don't wanna break the house just to test the driver's compression limit.
jat- Frequent Contributor
- Number of posts : 135
Age : 44
Location : malaysia
Registration date : 2009-03-15
Character sheet
Source(s):
Amplification:
Speakers:
![]()
![]()
Re: DIY monster sub for HT use
![]() by jat Fri Nov 23, 2012 3:36 pm
by jat Fri Nov 23, 2012 3:36 pm

may not have the looks of a truly high end sub, but since it only cost me RM3250 for the pair including the power amp, can't complain much.
next post will be about the 15" slot ported build.
jat- Frequent Contributor
- Number of posts : 135
Age : 44
Location : malaysia
Registration date : 2009-03-15
Character sheet
Source(s):
Amplification:
Speakers:
![]()
![]()
Slot ported multitune 15" sub (mfw15 variant)
![]() by jat Sat Nov 24, 2012 11:40 pm
by jat Sat Nov 24, 2012 11:40 pm

the original plan was to build this 6 cubic feet behemoth with 3 different tuning option at 22hz, 18hz and 11hz (if i remember correctly). but seeing that it's gonna be a little too big for my living room, not to mention i'm gonna have at least a couple of them flanking the left and right, the plan had to be scrapped.
been reading a lot about slot ported build and got numerous recommendation for mfw15. it's a smallish slot ported build using cheap drivers. while the original mfw15 are long depleted from the market, most people are saying that the dayton dvc15 is a direct replacement to the mfw15.
since the dvc15 is cheap, i guess why not. people are still posting good feedback for the original mfw even when the system require a bit of boost at the tuning frequency to help flatten the response. for the enclosure size, there's no way the sub will exhibit a flat response without some boost.
the original mfw15 had around 3 cubic feet of enclosure volume and it looks cute. so let's go with 3 cubic feet and have a bit of boost at
the bottom end just the mfw15. a lot of people seem to like it. my wife will surely love the small cabinet.
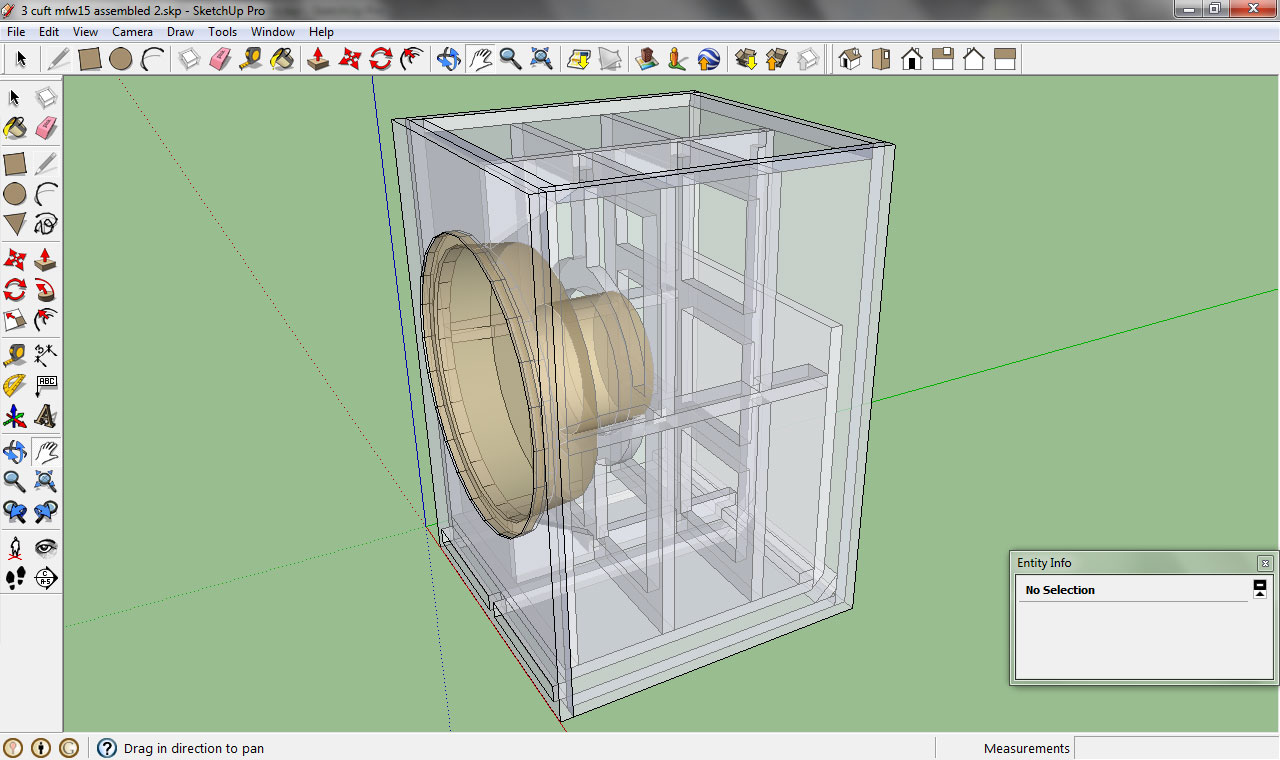
this fits the bill. the enclosure measures 46cm deep, 45 cm wide and 66cm high. total volume is 2.92 cubic feet after the bracing, port and driver volume. port measures 2.5cm x 19.8 cm x 81 cm. both the dvc15 and ixl15 will exhibit tuning frequency of 20hz and 14hz inside the cabinet.
internal bracing follows the excellent bracing configuration of the svs's pb13ultra with 4 side braces added to help with cabinet rigidity. following the lengthy discussion on avsforum about my previous bracing configuration and recommendation, hopefully this time the cabinet will be free of vibration during hard hitting low frequency.
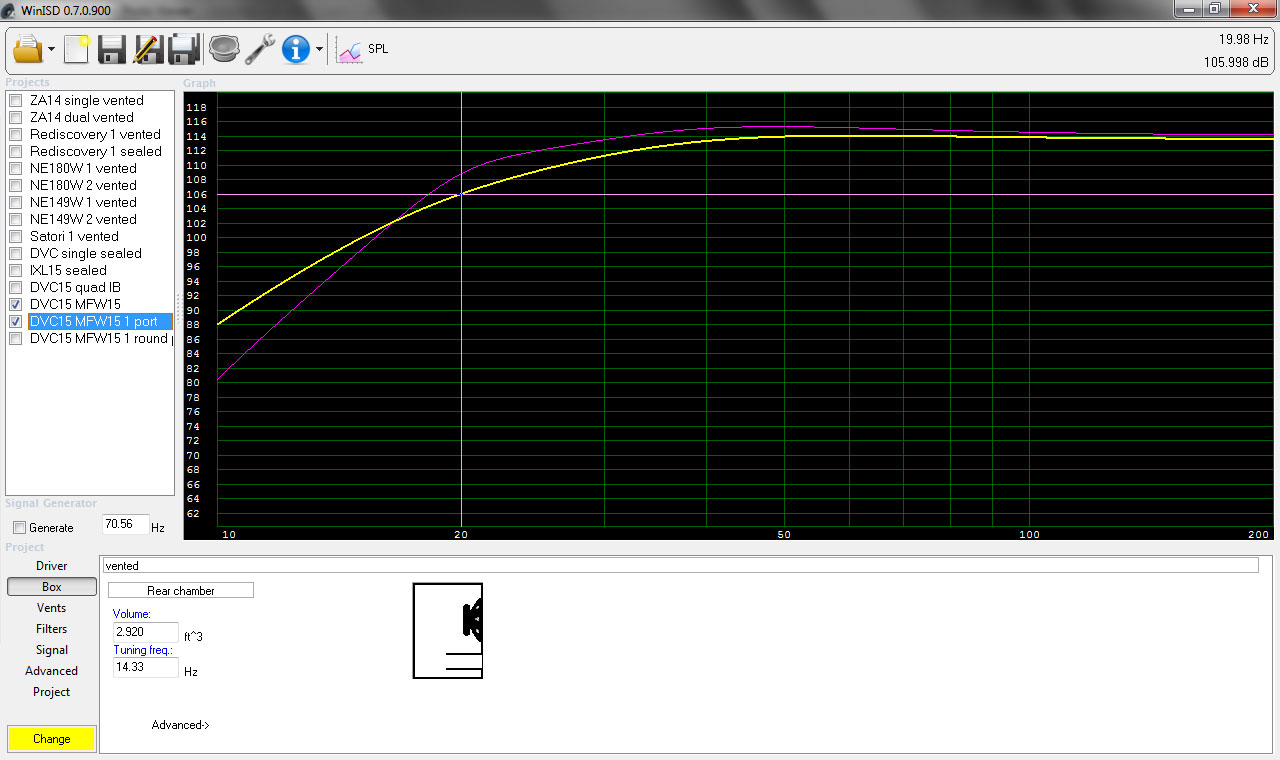
simulation shows that i could expect output at 108db (for the 20hz tuning) at 20hz and 106db (for the lower 14hz tuning) at 20hz. the higher tuning have 2-3db more output at 20-35hz compared to the lower tune, but the lower tuning will exhibit 8db more output at 10hz.
previously it is found that my living room have very little room gain below 20hz (refer to hifi4sale build thread for measurements). so the extra 8db at 10hz might be beneficial and allow me to reach single digit frequency.
and note that the enclosure volume have already been corrected to the nett volume (2.92 cubic feet).

port air speed are below 35m/s. pretty close to 35 but that would be at maximum output at tuning frequency. seeing that i'm gonna be running a couple of them the sub will never have to run at maximum output. the port opening would also be rounded to reduce port noise.
there's also 45 degrees angled guide at the port bend to help avoid any chuffing.

cone excursion are kept within safe limits with a high pass filter at 18hz and 14hz. simulation shows the sub would require ~400w power to reach maximum output.

most of the panels have already been cut for weeks now. sitting idly because i had some trouble (lazy) in getting a nice and flat cut with the angled port guide. anyway everything is complete last week so assembly will start this week.

dry assembly shows that all the panels are a perfect fit. man i love sketchup.

the build will start with the bracing.
jat- Frequent Contributor
- Number of posts : 135
Age : 44
Location : malaysia
Registration date : 2009-03-15
Character sheet
Source(s):
Amplification:
Speakers:
![]()
![]()
Re: DIY monster sub for HT use
![]() by jat Sat Nov 24, 2012 11:49 pm
by jat Sat Nov 24, 2012 11:49 pm

braces are glued last night for 12 hours. should be dry enough already so assembly will continue with the front baffle.
i'll be adding supporting screws later this evening (rather than depending on just glue to hold everything in place). that should allow me to continue assembling other panels while waiting for the glue to be completely dry (24 hours).
hopefully the entire assembly won't reach a week like in the previous builds. hoping the enclosure could be done in 3-4 days.

braces have been glued and attached to the front baffle. side panels, top panel and the ports have been assembled.
assembly of the ports are a pain to do. shouldn't have went overboard with the angled port guides. the idea was to avoid any port chuffing at the 90 degrees turn, but it sure took a while to cut and trim the angled pieces.
next build i'm gonna go with the simpler (and much easier) round ports. scouted around and found 2 inch to 4.5 inch PVC pipes selling in 0.5 inch increment. nice.
jat- Frequent Contributor
- Number of posts : 135
Age : 44
Location : malaysia
Registration date : 2009-03-15
Character sheet
Source(s):
Amplification:
Speakers:
![]()
![]()
Re: DIY monster sub for HT use
![]() by jat Sun Nov 25, 2012 12:05 am
by jat Sun Nov 25, 2012 12:05 am

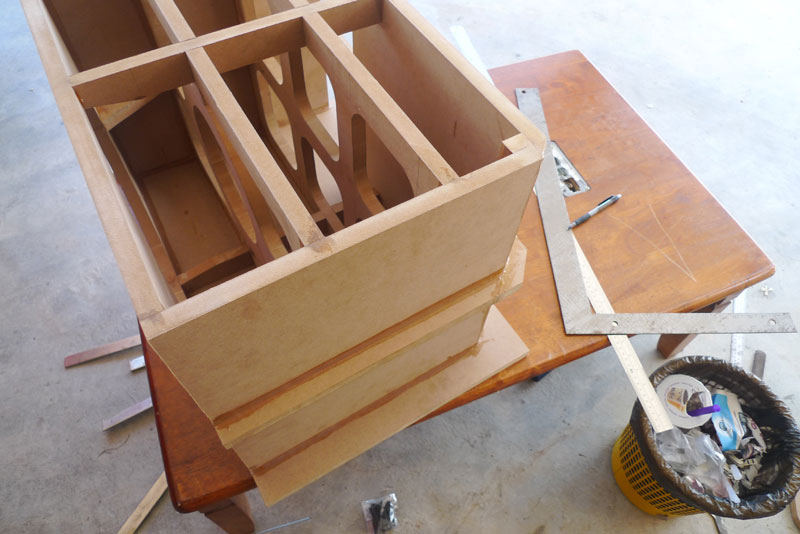
most of the panels have been assembled. learning from previous mistake, i've extended 4mm at the corner edges to allow for flush trim. part of the port's internal faces have been painted brown to hide the mdf color as the port are not gonna be vinyl-ed.

the 45 degrees angled guide have also been glued. with the help of some hammering and sanding. you wouldn't believe how much effort it takes to construct the port with the guides and separator. no wonder people build them with a single tuning frequency and skipping any kind of angled guides.
port construction have got to be the most difficult part of this build.

and finally all the parts have been assembled, except for the front baffle.
the front baffle is sitting outside clamped and glued to the rest of the cabinet. i'm gonna leave it overnight to dry and hopefully tomorrow morning it'll be dry and strong enough to receive the mounting t-nuts.
t-nuts, the speakon connector and it'll be ready for the woofer. if all goes well i should have some initial measurement by tomorrow night.
jat- Frequent Contributor
- Number of posts : 135
Age : 44
Location : malaysia
Registration date : 2009-03-15
Character sheet
Source(s):
Amplification:
Speakers:
![]()
![]()
Re: DIY monster sub for HT use
![]() by ocgassa Sun Nov 25, 2012 4:04 am
by ocgassa Sun Nov 25, 2012 4:04 am
ocgassa- New Member
- Number of posts : 6
Age : 37
Location : Setapak
Registration date : 2011-09-07
![]()
![]()
Re: DIY monster sub for HT use
![]() by jat Mon Nov 26, 2012 10:27 pm
by jat Mon Nov 26, 2012 10:27 pm
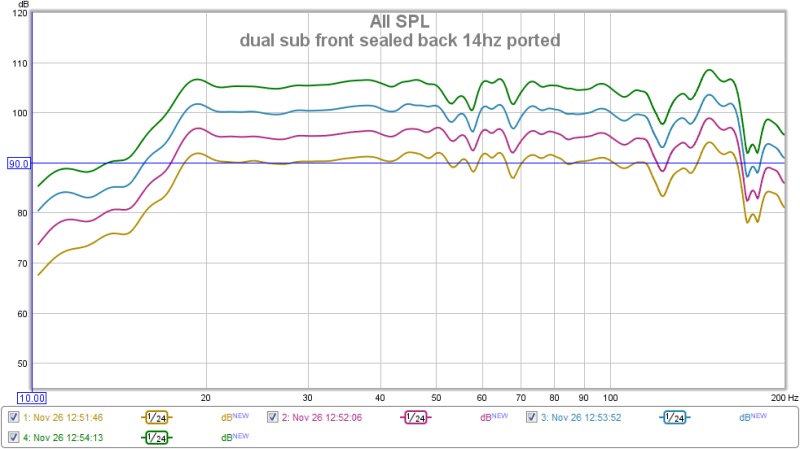
graph is calibrated to actual spl.
i even tried 110db but stopped halfway through the sweep because things are starting to vibrate across the room. the output from sealed & ported pair sounds like they're clean for higher spl compared to sealed & sealed pair.
there's a clear difference between a sealed & ported sub. since the slot ported build are capable of different tuning at 20hz, 14hz and could also be configured in sealed, i'm able to differentiate the difference.
i've read somewhere in some forum, someone said that a ported sub won't be able to pressurize a room as a sealed sub (or an infinite baffle sub) would be able to do. i can attest to the opinion.
i find that a sealed sub are better in pressurizing the room as the back pressure are kept inside the enclosure. the cone will move air in or out of the room according to frequency. whilst a ported sub will feed the air pressure back to the room through the port.
with a sealed sub, you're able to feel the low frequency clearly. 'feel' as in knowing that it affects your ear diaphragm and make you feel dizzy. i'm able to clearly distinguish low frequency to around 6hz with the sealed sub. with the ported sub, even at 18-19hz the effect start to diminish.
with the ported sub, you'll 'hear' the low frequency better.
with a sealed sub, you'll 'feel' the low frequency better.
so is the sealed sub better than ported?
i won't go as far as saying better. running the twin sealed, the low frequency sometimes is just too much and gets into your head. i don't like it.
just running ported would mean that you'll lose a lot of the low frequency effect. i personally won't run everything ported after hearing it. sure you'll get crazy high spl, but you'll lose the low frequency feel.
even at 20hz, the sealed sub just 'feel' better compared to 20hz on the ported.
maxx (htkaki) have been recommending people to go for sealed & ported pair and i support his advice. there's better midbass impact while still retaining the low frequency feel. the ported sub offset any over pressurization that the sealed sub is doing to the room. the entire setup sounds like it's clean to higher spl and you're able to run the sub hotter (if that's your thing).
and the sealed & ported configuration seem to make the low frequency more detailed. like there's more texture to the bass notes. i might just be imagining things but the speaker also sound like they're more detailed now.
anyway that's my initial impression. in which it could change after more experimentation. it might not be similar to your finding, but i do prefer how the sealed & ported pair sounds in my room. i'll be keeping the sealed & ported configuration.
now all i gotta do is build another one.
jat- Frequent Contributor
- Number of posts : 135
Age : 44
Location : malaysia
Registration date : 2009-03-15
Character sheet
Source(s):
Amplification:
Speakers:
![]()
![]()
Re: DIY monster sub for HT use
![]() by topet Tue Nov 27, 2012 10:37 am
by topet Tue Nov 27, 2012 10:37 am
topet- Club Member
- Number of posts : 32
Age : 40
Location : Kedah
Registration date : 2011-09-16
![]()
![]()
Re: DIY monster sub for HT use
![]() by jat Sat Dec 01, 2012 12:51 pm
by jat Sat Dec 01, 2012 12:51 pm
i'm gonna build 2. one for the rear left and one for the rear right, flanking the glassware cabinet and put the huge oven on top of it.topet wrote:errr..why don't you build two my long lost brother....
implementing all the knowledge and experience gained from all the previous build i came up with this initial sketch:

5.5 cubic feet outside dimension. nett volume about ~4.5 cubic feet after bracing and port. 3 round 3 inch port tuned to 20hz, 16hz and 11hz. cross bracing. 18mm mdf.
jat- Frequent Contributor
- Number of posts : 135
Age : 44
Location : malaysia
Registration date : 2009-03-15
Character sheet
Source(s):
Amplification:
Speakers:
![]()
![]()
Re: DIY monster sub for HT use
![]() by jat Sat Dec 01, 2012 10:40 pm
by jat Sat Dec 01, 2012 10:40 pm

and since online calculators are not precise enough as i would like them to be, i derived some formula and created a better calculator.

internal volume 5.208 cubic feet. after bracing and port and driver i'm left with 4.48 cubic feet.
though the panels do have quite a long, unbraced section. it would probably be fine as is but seeing that i'm gonna spend at most 0.1 cuft to add side braces think i'll be adding some braces to the side to help enforce the long section.
probably not needed, but better safe than sorry. 4.38 cuft is still aplenty.
jat- Frequent Contributor
- Number of posts : 135
Age : 44
Location : malaysia
Registration date : 2009-03-15
Character sheet
Source(s):
Amplification:
Speakers:
![]()
![]()
Re: DIY monster sub for HT use
![]() by jat Sat Dec 01, 2012 11:08 pm
by jat Sat Dec 01, 2012 11:08 pm

how's that for heavily braced?
assembled it should look something like this:

viewing around i think everything is alright. there's no misaligned panel somewhere.

4.39 cuft nett volume after the additional side bracing. let's input that into the simulation.
jat- Frequent Contributor
- Number of posts : 135
Age : 44
Location : malaysia
Registration date : 2009-03-15
Character sheet
Source(s):
Amplification:
Speakers:
![]()
![]()
Re: DIY monster sub for HT use
![]() by Hi-Fi 4 Sale Sun Dec 02, 2012 12:32 am
by Hi-Fi 4 Sale Sun Dec 02, 2012 12:32 am
This is amazing work. 6 months on and we see the realisation from concept to tangible.
Multi-faceted skills in electronics, woodworking & testing.
Hi-Fi 4 Sale- Admin

- Number of posts : 934
Age : 54
Location : Kuala Lumpur
Registration date : 2008-12-06
Character sheet
Source(s): Streamer
Amplification: Amps
Speakers: Speakers -

![]()
![]()
Page 1 of 2 • 1, 2 ![]()
![]()

 Similar topics
» Monster 304 XLN 4C-5meter used
» Monster Mseries 550/1m (Used)
» Monster Cable (RCA)
» Monster Interlink 400
Hi-Fi 4 Sale - Malaysia / Singapore Audio Forum & Marketplace | www.hifi4sale.net :: Discussion Forum & Knowledge Base :: DIY Projects